January 23, 2011

Show Build-Information in your iOS App About Panel

Sometimes it might be useful to have an exact piece of information about what version of an app you have currently running. Especially if you have a decent Testing-Group, it is important to track the versions in which a bug appears. The goal of this post is to achieve a info panel like this in your application. You get the Application version (from the Application Bundle), the Repository Revision and the Date of the last Commit.

BuildInfo.png

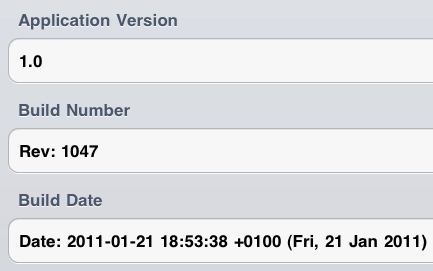
Picture 1: Example Application About Dialog


We are using here the build-in functions of subversion to update given keywords with the repository information. More about this topic here. There is also a way to use this method with git, but i did not test it yet. You may find out more about this here

The first step is to create a File-Template you can import in your code, with which you can access all the necessary details:


#define APP_VERSION   \ 
[[[NSBundle mainBundle] infoDictionary]   \  
objectForKey:@"CFBundleVersion"]
#define APP_EXECUTABLE   \ 
[[[NSBundle mainBundle] infoDictionary]   \  
objectForKey:@"CFBundleExecutable"]
#define APP_NAME   \ 
[[[NSBundle mainBundle] infoDictionary]   \  
objectForKey:@"CFBundleName"]
#define APP_BUILD_REVISION @"$Rev$"
#define APP_BUILD_DATE @"$Date$"
#define APP_LAST_AUTHOR @"$Author$"

Code 1: version.h template


The next step is to tell Subversion to replace the placeholder with the subversion values. You can do this with setting the subversion keyword for that file. After that, with every commit of the file "version.h" the values will be updated.


svn propset svn:keywords 'Revision Author Date' version.h

Code 2: version.h template


The very last step is to make sure, that "version.h" will be updated each time you make a change to your application. Assuming you build your app every time you made a change, you can use the functions, build into Xcode to force an update on "version.h". We use the trick, that every change on the propsets of "version.h" is equal to a file modification itself. So we create a small bash script, setting the propset "build" to a new value. After that, "version.h" needs to be commited as a new version.


#!/bin/sh

DATE=`date`
HOST=`hostname`

svn propset build "$HOST $DATE" Version.h

Code 3: buildUpdate.sh


Now we need to add the run of "buildUpdate.sh" to our Build-Cycle. (Picture 2 & Picture 3).

TargetSettings.png

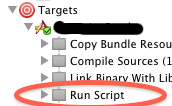
Picture 2: Project Target Settings


RunScriptSetting.png

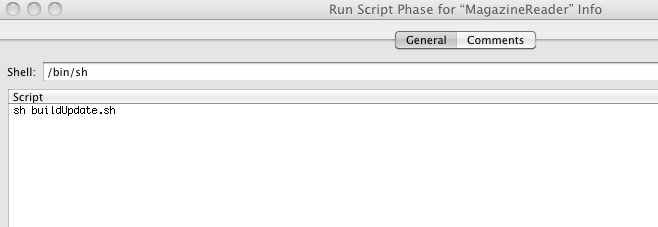
Picture 3: Insert Script Call


After a successful commit, the file "version.h" will look something like this:


#define APP_VERSION   \ 
[[[NSBundle mainBundle] infoDictionary]   \  
objectForKey:@"CFBundleVersion"]
#define APP_EXECUTABLE   \ 
[[[NSBundle mainBundle] infoDictionary]   \  
objectForKey:@"CFBundleExecutable"]
#define APP_NAME   \
[[[NSBundle mainBundle] infoDictionary]   \  
objectForKey:@"CFBundleName"]
#define APP_BUILD_REVISION @"$Rev: 1047 $"
#define APP_BUILD_DATE @"$Date: 2011-01-21 18:53:38 +0100 (Fri, 21 Jan 2011) $"
#define APP_LAST_AUTHOR @"$Author: phaus $"

Code 4: updated version.h


You might modify the output (e.g. filter out the $s or reformat the date) to get a more stylish output.

January 22, 2011

Using UIAutomation for Multilanguage iOS Applications

With the appearance of iOS 4.0 Apple introduced a new Test-Framework for automatically UI Testing: UI Automation. Based on Javascript and build-in into Instruments, UI Automation is a very useful tool during the Developing of iOS Application.

A very good introduction in UIAutomation is here and here.

During the development of a iOS Application, we decided to port it to iOS 4.0 and therefor use also UIAutomation for regression testing (before that we used GHUnit Tests for Component Testing - but thats another story).

As we are primarily a company dealing with web-based application, we had almost zero afford to deal with the Javascript syntax of UI Automation. But we had to deal with the fact, that we developing a dual language Application (de and en), and therefore need a possibility to test the whole UI in both languages.

If you are familiar with UI Automation, you probably know that the Framework uses the accessibility labels of your UI and also often Button Labels. So you have to deal with the actual language of the current UI Setting. But wait. There is already a valid mapping of different language to a given key. If you internationalize your application you will use so called Localizable.strings to do your language Mapping (more here).

So we just need a way to move our already existing Mapping into our UI Automation world. UI Automation supports the import of separate JavaScript Files to use your own Libraries and Settings. So i build a conversation script to translate your different Localizable.strings to JavaScript and moving all languages into one big collection.

So for example a String like this:

    "Library" = "Bibliothek";
    "Shop" = "Kiosk";

Will be converted to:

    UIA.Localizables = {
    "de":{
    ...
    "Library" : "Bibliothek",
    "Shop" : "Kiosk",
    ...
    },
    "English":{
    }
    ...
    }

The next step is to determine during your UIAutomation Test which language Setting you need to Load from your Localization File. It is possible to readout some System Settings during an UIAutomation Test. The basic functions to find your current language and to read the correct language Array look like this:

    UIA.getCurrentLang = function(){
        if(application.preferencesValueForKey("AppleLanguages")[0]  == "en")
            return "English";
        else
            return application.preferencesValueForKey("AppleLanguages")[0];
    }
    UIA.getCurrentLocalizables = function(){
        return UIA.Localizables[UIA.getCurrentLang()];
    }

    var Localizable = UIA.getCurrentLocalizables();

The first function is necessary to capture a quirk of the recent Xcode Versions (some people calling it a bug :-) ).

So now we can just use our String within our Test-Cases.


#import "lib/Localizables.js"

function    delay(seconds){
    UIATarget.localTarget().delay(seconds);
}

function tapTab(name){
    var window = UIATarget.localTarget().frontMostApp().mainWindow();
    window.tabBar().buttons()[name].tap();
}

var window = UIATarget.localTarget().frontMostApp().mainWindow();
tapTab(Localizable['Library']);
delay(1);
tapTab(Localizable['Shop']);
delay(7);

I attached the conversion script to this post. You just need to alter the source and destination folders of your i18n files and the UIAutomation-Tests directory.

Download file

August 15, 2010

Philipps 5 mins: Graph-Fun with AJAX and Canvas

I always searched for an efficient way add dynamic diagrams to a web-project without using flash or other plugin-based magic.

With the support of the canvas tag element in almost all mainstream browser, i thought it would be a good time for creating a short demo how things workout.

You will need at least two Parts for this demo. First of all you will need a Source JSON feed. For this demo i just hacked together a very basis PHP script:

<?php
header('Content-type: application/json');
echo'{';
echo '"value":"' . rand(0, 60) . '"';
echo '}';
?>

The result is something like:

{"value":"34"}

Secondly you need a Webpage, where you want to insert your canvas element, load the data from the json feed and draw the changing values to the canvas element.

For a better performance, we will implementing pulling the data and drawing the data within two parallel cycles. The Common data Storage will be an array of 300 value (for our diagram with a width of 300px).

We are using two additional JS Files. The first we need for creating our XHTTPRequest Object and handling the response within a callback method. The second script is for parsing the JSON Feed as a Javascript Object in a safe way (an ordinary eval works, but is to unsecury).

Our main-script works in several steps:

First we initialize an array with empty elements:


    function init(){
        for(var i=0; i < 300; i++){
            randomValues[i] = 0;
        }
    }

This step is optional, but then you have a nice "zero line" at the beginning.

Secondly we have a method, that pushes a new value to the existing array, and drops the first entry, if the length of the array is greater than 300.


    function addValue(arr, value){
        if(arr.push(value) > 300){
            arr.shift();
        }
    }

The next two methods are necessary for sending our ajax-request and for handling the response in a callback method. Basically the callback method just calls the addValue method.

The timeout variable is set to 200 ms. So the script calls our backend periodically every 200 ms and then adds a new value to our array.


    function pullValue(){
        sendRequest('random.php',handleRandomRequest);
        setTimeout(pullValue, timeout);
    }

    function handleRandomRequest(req) {
        var text = JSON.parse(req.responseText);
        addValue(randomValues, text.value);
    }

The last method is for the drawing functionality:


    function draw(){
        ctx.clearRect(0, 0, 300, 60);
        ctx.fillStyle = "rgba(101,101,101, 0.5)";
        ctx.fillRect (0, 0, 300, 60);
        ctx.lineWidth = 1;
        ctx.strokeStyle = 'blue';
        ctx.beginPath();
        ctx.moveTo(1, 60-parseInt(randomValues[0]));
        for (var i=1; i<randomValues.length; i++){
            value = 60-parseInt(randomValues[i]);
            ctx.lineTo(i,value);
        }
        ctx.stroke();
        setTimeout(draw, timeout);
    }

ctx is a 2d context of the canvas element. On every call of the draw method, all elements of the array are painted. The first element is always the start point. Because the canvas coordinate system has the point 0,0 in the upper left corner but the 0,0 point of our diagram should be in the lower left corner, you have to subtract the array-values from 60 to get the right drawing coordinate. This method also runs periodically every 200 ms. But it also works for two times for pulling the data an drawing it.

Here you can see the script in action

January 28, 2010

creating JNI with Swig

I am currently playing around with JNI and Java due the colleagues question to make the connect features of jack-audio (http://jackaudio.org) accessible to java.
There is already a javalib (http://jjack.berlios.de) with some features, there seems still some needes ones missing.

So i started today to have a look into SWIG (http://swig.org).

"SWIG is a software development tool that connects programs written in C and C++ with a variety of high-level programming languages."

After some hours of research i ended up with some facts:

To created yourself a Java binding to a given c/c++ Program or Library you need one or more Interface files (*.I) and swig file with all the necessary swig module descriptions.

There is an example on the swig homepage ( http://www.swig.org/Doc1.3/SWIGDocumentation.html#Introduction) to explain the workflow of SWIG.

There is a c file exmple.c:

/* File : example.c */

double My_variable = 3.0;

/* Compute factorial of n */
int fact(int n) {
if (n <= 1) return 1;
else return n*fact(n-1);
}

/* Compute n mod m */
int my_mod(int n, int m) {
return(n % m);
}


The mapping example.i files looks as the following:

/* File : example.i */
%module example
%{
/* Put headers and other declarations here */
extern double My_variable;
extern int fact(int);
extern int my_mod(int n, int m);
%}

extern double My_variable;
extern int fact(int);
extern int my_mod(int n, int m);


As you can see, the Interface file has a similar syntax with some additional meta information.

You can now create your JNI bindings:

swig -java example.i


There are also flags for different other languages:

-allegrocl - Generate ALLEGROCL wrappers
-chicken - Generate CHICKEN wrappers
-clisp - Generate CLISP wrappers
-cffi - Generate CFFI wrappers
-csharp - Generate C# wrappers
-guile - Generate Guile wrappers
-java - Generate Java wrappers
-lua - Generate Lua wrappers
-modula3 - Generate Modula 3 wrappers
-mzscheme - Generate Mzscheme wrappers
-ocaml - Generate Ocaml wrappers
-octave - Generate Octave wrappers
-perl - Generate Perl wrappers
-php - Generate PHP wrappers
-pike - Generate Pike wrappers
-python - Generate Python wrappers
-r - Generate R (aka GNU S) wrappers
-ruby - Generate Ruby wrappers
-sexp - Generate Lisp S-Expressions wrappers
-tcl - Generate Tcl wrappers
-uffi - Generate Common Lisp / UFFI wrappers
-xml - Generate XML wrappers

As a result you get three new files:

example.java
exampleJNI.java
example_wrap.c

The example_wrap.c can be used to compile the needed library file for your JNI access.
The two java Files are the basic JNI implementation:

class exampleJNI {
public final static native void My_variable_set(double jarg1);
public final static native double My_variable_get();
public final static native int fact(int jarg1);
public final static native int my_mod(int jarg1, int jarg2);
}

And a basic java example how to access these functions:

public class example {
public static void setMy_variable(double value) {
exampleJNI.My_variable_set(value);
}
public static double getMy_variable() {
return exampleJNI.My_variable_get();
}
public static int fact(int arg0) {
return exampleJNI.fact(arg0);
}
public static int my_mod(int n, int m) {
return exampleJNI.my_mod(n, m);
}
}

To get into working with SWIG i can advise the sources of the G4Java Project (http://java.freehep.org/sandbox/G4Java).
There is also a maven plugin to use SWIG from within your maven build: http://java.freehep.org/freehep-swig-plugin.

I am currently trying to create the necessary Interface files from the jack-audio sources to use them for a first run of SWIG. For python and tck you can use cmake to create these files.

November 8, 2009

Wiederherstellen eines MacOS Festplatten-Backups mit Hilfe von DD

Das Festplattendienstprogramm von MacOS bietet unter einer übersichtlichen Oberfläche ein umfangreiches Tool um mit Festplatten zu arbeiten.
Allerdings gibt es hier einige Probleme, welche oftmals einen Umweg über das Terminal benötigen.

Ich habe das Tool dazu benutzt um eine Festplatte aus einem neu erworbenen Netbook zu sichern, bevor ich mit verschiedenen Linux Distributionen spiele :-).
Das war notwendig, weil diese Festplatte eine Recovery-Partition enthält, von der man dann ggf. das Windows-System wiederherstellen kann.

Das Festplattendienstprogramm ermöglicht es sehr einfach, ein Image von einem kompletten Device (einer Festplatte) zu ziehen. Hierbei werden auch gleich nicht gefüllte Bereiche ausgespart, sodass von der 160 GB Platte ein knapp 8GB großes Image übrig bleibt. Bis zu diesem Zeitpunkt befand ich mich noch in dem Glauben, dass ich das Image zu einfach wieder zurückspielen könnte.

Achja: Für das Backup habe ich die 2,5" SATA Platte ausgebaut und mit Hilfe eines USB-SATA Adapters meinem MacBook Pro zur Verfügung gestellt.

Die Struktur der Festplatte sieht wie folgt aus:


bash-3.2# diskutil list
...
/dev/disk1
#: TYPE NAME SIZE IDENTIFIER
0: FDisk_partition_scheme *160.0 GB disk1
1: Windows_NTFS System 85.9 GB disk1s1
2: DOS_FAT_32 69.6 GB disk1s2
3: 0xDE 4.5 GB disk1s4

...

Dem unbedarften Leser scheint hier nichts besonderes aufzufallen, allerdings ist die letzte Partition vom Typ EISA-Konfiguration und kann von MacOS nicht gemountet werden. Interessanterweise ist es dem Festplattendienstprogramm aber möglich, die Partition mit in ein Gesamt-Image zu sichern, wenn man das komplette Device sichert. Dummerweise ist eine Wiederherstellung auf Device-Ebene nicht vorgesehen :-).

D.h. es ist möglich die Partition mit der (aktuellen) Windows Partition(NTFS), sowie eine weitere Partition mit Update-Daten(FAT32) wiederherzustellen, aber die eigentlich Revocery-Partition bleibt im Nirvana verschollen :-/. Weiterhin ist es hierzu notwendig, das sowohl Zielfestplatte, als auch Backup-Image die identische Partition-Struktur haben - d.h. legt ein Linux-Installer ein eigenes Partition-Schema an, so ist es nicht mehr so einfach möglich, das Backup wieder einzuspielen.

Was uns bei beiden Problemen hilft ist das Unix-Tool "dd".
Als allererstes ist es wichtig, herauszufinden, wie die beiden Devicenamen lauten. Hierzu mounten wir das Backup-Image und schließen die Festplatte wieder an den Mac an.
Danach lassen wir uns die Disk-Device auflisten:

bash-3.2# diskutil list
/dev/disk0
#: TYPE NAME SIZE IDENTIFIER
0: GUID_partition_scheme *200.0 GB disk0
1: EFI 209.7 MB disk0s1
2: Apple_HFS Imotep HD 199.7 GB disk0s2
/dev/disk1
#: TYPE NAME SIZE IDENTIFIER
0: FDisk_partition_scheme *160.0 GB disk1
1: DOS_FAT_32 DISK1S1 84.9 GB disk1s1
2: Linux_Swap 970.6 MB disk1s3
3: DOS_FAT_32 69.6 GB disk1s2
4: 0xDE 4.5 GB disk1s4
/dev/disk2
#: TYPE NAME SIZE IDENTIFIER
0: FDisk_partition_scheme *160.0 GB disk2
1: Windows_NTFS System 85.9 GB disk2s1
2: DOS_FAT_32 69.6 GB disk2s2
3: 0xDE 4.5 GB disk2s4


Unsere Quelle ist /dev/disk2, unser Ziel /dev/disk1. Als allererstes kopieren wir den MBR vom Image auf die Festplatte (hier ist auch die Partition-Tabelle gespeichert - man erspart sich das aufwendige Neu-Partitionieren). Der MBR befindet sich innerhalb der ersten 512k einer Festplatte.

bash-3.2# sudo dd if=/dev/disk2s1 of=/dev/disk1s1 bs=512 count=1

Nun sind wir in der Lage die beiden sichtbaren Partitionen über das Festplattendienstprogramm wiederherzustellen. Hierzu wählen wir unser Ziel an. Unter dem Tab "Wiederherstellen" ziehen wir einmal unsere Zielpartition in das Input-Feld "Ziel" und aus dem gemounteten Image die Quell-Partition in das Input-Feld "Quelle". Sollte das Programm eine Fehlermedung ausgeben, so ist es ggf. notwendig, die Partitionen erst zu deaktivieren (Partition anwählen und über die Toolbar oben deaktivieren). Nach einigen Minuten sollte das Backup eingespielt sein. Dies ist ein großer Vorteil gegenüber von "dd", weil dd die Daten sektorweise wiederherstellt (also auch Nullsektoren 1:1 überträgt), während das Festplattendienstprogramm nur die reinen Daten überträgt und Nullsektoren ausspart.

Was bleibt ist die letzte nicht-sichtbare Partition. Dies kopieren wir nun abermals per "dd". Um nicht kB-Weise zu kopieren wählen wir hier 512MB Slices:

dd if=/dev/disk2s4 of=/dev/disk1s4 bs=512m

Obwohl es nur knapp 5GB sind, nimmt der Kopiervorgang einiges an Zeit in Anspruch, sodass sich abschätzen lässt, wie zeitaufwendig ein Wiederherstellen der kompletten 160GB per "dd" wäre.

Mich hat diese Erkenntnis eine halbe Nacht gekostet :-). Vielleicht steht irgendjemand einmal vor dem gleichen Problem (z.B. sichern/wiederherstellen von reinen Linux Partitionen).


Blogged with the Flock Browser

July 2, 2009

ja,

ich lebe noch. Sobald mir mehr einfällt, schreibe ich mal wieder was :-).

May 17, 2009

VirtualBox error: fixing VDI already registered

Oftmals ist es zweckmäßig, eine Art Template-Image für eine virtuelle Maschine (VM) zu erstellen, mit welchem man eine saubere Basis erhält, auf der man Software installieren kann, speziell für die einzelne VM.
Das Problem ist, dass VirtualBox in jedes VDI (virtual disk image) eine eindeutige ID schreibt, welche es verhindert, dass eine identische Copy eines Images mehrmals eingebunden wird.

Constantin Gonzalez hat dazu in seinem Blog eine interessante Lösung beschrieben.

Ich habe das zum Anlass genommen, diesen Befehl in ein bash-script zu gießen ;-).

Hier als das Script:


#!/bin/sh
# Copy VDI with unique identifier
if [ $# -ne 2 ]; then
    echo "Usage: ./copyVDI.sh <VID-source> <VID-target>"
    exit 1
else
    if [ $1 == $2 ]; then
        echo "VID-source has to be not equal to VID-target!"
        exit 1
    fi
    cp $1 $2
    dd if=/dev/random of=$2 bs=1 count=6 seek=402 conv=notrunc
    exit 0
fi

Das Script sollte selbsterklärend sein.
Faktisch kann man hiermit eine Copy eines VDIs anlegen, welche gleichzeitig eine eindeutige ID erhält.


Blogged with the Flock Browser

March 28, 2009

GnuPG Java Wrapper API

Yaniv Yemini wrote a small GnuPG Java Wrapper API. Just had a small look over it. So to get it your version from here: http://www.macnews.co.il/mageworks/java/gnupg Here is just a small demo:
import javax.swing.JOptionPane;

import org.gpg.java.GnuPG;

public class Loader {

public static void main (String args[]){
	GnuPG pgp = new GnuPG ();
		
	String toolChain[] = {"sign", "clearsign", "signAndEncrypt", "encrypt", "decrypt"};
	String message = JOptionPane.showInputDialog(null, "Message you want to encrypt?", "Enter your message", JOptionPane.QUESTION_MESSAGE);
	String keyID = "0x56B69D6B";
	System.out.println("using message: "+message);
	System.out.println("using key ID: "+keyID);
	for(String tool : toolChain){
		System.out.println("running: "+tool);
		if(tool.equals("sign")){
			String passPhrase = enterPassPhrase(tool);
			pgp.sign (message, passPhrase);				
		}

		if(tool.equals("clearsign")){
			String passPhrase = enterPassPhrase(tool);
			pgp.clearSign (message, passPhrase);				
		}			
		if(tool.equals("signAndEncrypt")){
			String passPhrase = enterPassPhrase(tool);
			pgp.signAndEncrypt (message, keyID, passPhrase);				
		}
		if(tool.equals("encrypt")){
			pgp.encrypt (message, keyID);				
		}	
		if(tool.equals("decrypt")){
			String passPhrase = enterPassPhrase(tool);
			pgp.decrypt (message, passPhrase);				
		}				
		System.out.println("result: " + pgp.getGpg_result() + "\n\n");
		System.out.println("error: " + pgp.getGpg_err() + "\n\n");
		System.out.println("exit: " + pgp.getGpg_exitCode() + "\n\n");
	}
}
    
    public static String enterPassPhrase(String usage){
    	return JOptionPane.showInputDialog(null, "Please enter the Passphrase of your private Key for "+usage, "Passphrase", JOptionPane.QUESTION_MESSAGE);
    }

}
Unforntunetally there is a Problem with decrypting a message. It is possible to decrypt the String with the gpg CI Version, but within Java it does not work. So maybe the error is on my site :-).
Blogged with the Flock Browser

SortedProperties

Angenommen, man braucht für ein Java Property Set ein geordnete Ausgabe - zum Beispiel um einem Übersetzer eine sortierte Liste mit zu übersetzenden String zu liefern.

Man erstellt eine Klasse (zum Beispiel SortedProperties) und lässt diese von Properties erben.
Bedingt durch die Kapselung ist es notwendig, dass die Methoden

private static char toHex(int nibble) ;
private String saveConvert(String theString, boolean escapeSpace);
private static void writeln(BufferedWriter bw, String s);

und Attribute

private static final char[] hexDigit;

in die neue Klasse kopiert werden müssen.

Wir überschreiben die Methode
public synchronized void store(OutputStream out, String comments)

Diese Methode ist für das eigentliche Speichern in eine Datei verantwortlich.

Der neue Inhalt entspricht bist auf eine zusätzliche Sortierung dem alten:


public synchronized void store(OutputStream out, String comments)
throws IOException {

TreeMap propTree = new TreeMap();

for (Enumeration e = keys(); e.hasMoreElements();) {
String key = (String) e.nextElement();
String value = (String) get(key);
key = saveConvert(key, true);
value = saveConvert(value, false);
propTree.put(key, value);
}
BufferedWriter awriter;
awriter = new BufferedWriter(new OutputStreamWriter(out, "8859_1"));
if (comments != null)
writeln(awriter, "#" + comments);
writeln(awriter, "#" + new Date().toString());
Set keys = propTree.keySet();
for (Iterator iterator = keys.iterator(); iterator.hasNext();) {
String key = (String) iterator.next();
writeln(awriter, key + "=" + propTree.get(key));
}
awriter.flush();
}

Dies ist tatsächlich ein sehr einfacher Weg, um vorhandene Java-Methoden für eigene Zwecke anzupassen.

Blogged with the Flock Browser

March 22, 2009

advanced XML-Parser

Innerhalb unseres Projektes ist die Notwendigkeit entstanden, XML-Dokumente, die etwas umfangreicher als die Standard-Java-Deskriptoren sind, auf Gleichheit hin zu untersuchen.
Folgende XML-Strings sind gegeben:

A)
<items>
    <item name="a">
        <value>1</value>
    </item>
    <item name="b">
        <value>2</value>
    </item>
    <item name="c">
        <value>3</value>
    </item>
</items>

B)
<items>
    <item name="a">
        <value>1</value>
    </item>
    <item name="c">
        <value>3</value>
    </item>
    <item name="b">
        <value>2</value>
    </item>
</items>


Diese Untersuchung soll eine Aussagen über:
- Gleichheit: (2 Dateien enthalten das gleiche XML-Modell - sowohl in der gleichen Reihenfolgen A) , als auch in einer anderen Reihenfolge B) ).
- Veränderungen: welche Stellen sind verändert worden.

Während Forderung zwei sich noch mit einem einfachen String-Vergleich lösen lässt, ist Forderung eins nur durch das erkennen eines Modells lösbar.
Hierbei ist es notwendig, die einzelnen Knoten zu erkennen.
Zudem sind die zu-untersuchenden XML-Dateien > 5 MBb sodass viele - professionelle XML-Tools hier streiken müssen und mit Speicherfehlern aufgeben.

Der Ansatz der hier vorgestellt wird, setzt sich aus drei Stufen zusammen:


  1. SAX-basiertes Parsen der Datei und einlesen in eine Datenbank (aus Performance-Gründen wird hier H2 als inMemory Datenbank genutzt).

  2. Um schnelle Vergleiche zu ermöglichen wird ein Modell benutzt, welches u.a. auch in ZFS angewendet wird: Erkennen von Veränderungen anhand von Prüfsummen.
    Was bei ZFS dazu benutzt wird, um Änderungen innerhalb des Dateisystems zu erkennen, soll hier dazu dienen, Unterschieder zwischen zwei XML-Modellen schnell und zuverlässig zu erkennen.
    Hierzu wird für jeden Knoten eine Prüfsumme berechnet. Diese leitet sich jeweils aus den Prüfsummen seiner Kindsknoten, dem Inhalt seiner Attribute und dem Wert des Knotens ab.
    Momentan wird über diesen Gesamt-String ein SHA1-Hash gebildet. Eine weitere Prüfsumme wird benötigt, um den Knoten innerhalb des Modells zu lokalisieren (wir verwenden hier den XML-Path+Knotennummer):


    1. <--                   Hash des Pfades                   -->
      3a52ce780950d4d969792a2559cd519d7ee8c727 
      ./
      items/item/value           


    2. <--             Hash des Knotens item              -->
      481e6ff69a8402231a3b9c6e46a7fef4f09adbb3
      hash von: "item", attribute "name=b", hash von "value"


  3. Da sowohl eine Aussage über Unterschied im sortierten Zustand - die Reihenfolge der (Kinder-)Knoten ist wichtig - als auch im unsortierten Zustand (Die Reihenfolge der Kinder-)Knoten ist egal,
    wird vor dem Berechnen des Hashes des Kindes eines Knotens, die Kinder einmal unsortiert und einmal sortiert als Basis für den SHA1-Hash genommen.


Momentan ist das Datenmodell soweit vollständig, die Knotenwerden beim Parsen in die Datenbank eingelesen. Dieser Vorgang wird momentan noch hinsichtlicher Dauer und Speicherverbrauch optimiert. Auch eine aussagekräftige Fortschrittanzeige sollte eingebaut werden. Danach muss der Algorithmus zum Erkennen der unterschiedlichen Stellen implementiert werden.
Als letztes sollen diese Unterschiede in einer übersichtlichen und - für große Dokumente - gut navigierbaren GUI angezeigt werden.

Blogged with the Flock Browser